Friday, 22 April 2016

Smooth Operator Small Component Modelling

I started off the sunglasses modelling by making the small components that are quite simple to make using the solid modelling techniques that I already know how to do. The other components are more complex and will require surface modelling.

Arm Hinge 

Nose Grip

"Smooth Operator" Hero Shots


Sunday, 3 April 2016

Part and Assembly Drawings


Minifgure Accessory

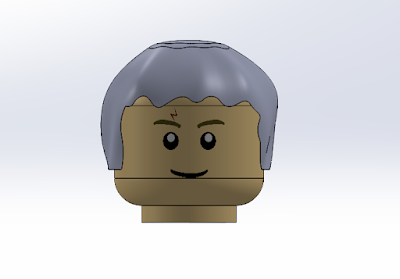
There were a few accessories I thought about making for Harry like a wand or broomstick but I decided to make him some hair since the figure that I have is actually Hermione Granger. I used a series of planes to create the loft for the hair. The two middle planes are circles made using the spline tool to create the illusion of waves in the hair. I ended up using some guide curves as well.

I first drew a sketch of the inside head shape and used this as a guide for the loft. I created a solid shape using the loft and then used a revolve cut to hollow out the inside shape.


I drew the shape for the face cutout on the front plane and cut through one side of the helmet. I did the same for the back edges to give the hair a less straight cut against the back of the head. Finally I did a fillet around the entire edge and changed the appearance to resemble the correct hair colour.


Completed Assembly

This is the completed assembly- made of two sub assemblies and one part.

Modelling the Waist and Legs

I thought that the waist was going to be a really hard part but it ended up being relatively simple in comparison the the arm. I built the top half by modelling one side and then mirroring the features onto the other side.


I really wanted to get the detail on the bottom half of the waist right so I worked really hard to get the geometry and the shapes right. The part that I worked on the most was the bottom part that is actually on an angle from the rest of the part.


The leg was also relatively simple, except I didn't initially notice that the outside face is in fact on an angle which is why the base is slightly wider than the top. I achieved this by modelling the part at the base thickness and then doing a cut along the outside edge to get the angle and thickness right. I then had to mirror the part the same way I did the arm so that I have a left and a right leg.


I was immediately worried when i added the waist par in my mock assembly because I mated it to the edge of the chest and I saw that its width was very different. I freaked out and then quickly looked at my real minifigure to see that the waist is in fact smaller than the chest, it just needs to be centered. 


Saturday, 2 April 2016

Modelling the Minifigure Hand

Now that there are not more video tutorials I am on my own when it comes to figuring out how to model the remaining parts. Starting with he hand I decided to just delve in so I started by making a cylinder for the hand and cutting the opening into it.


I used the same technique used to create the elbow bend in the arm to create a separate plane on an angle to get the bend in the wrist. This took a couple of tries to get the correct angle but I was eventually happy with it. From there i was able to just extrude the rest of the arm insert.


Now that I had the hands I was able to make a mock assembly of the top half of the minifigure and I am really happy with how it is looking.