Computer Modelling: Technical Drawing
Friday, 24 June 2016
Wednesday, 22 June 2016
Final Stages Of Modeling
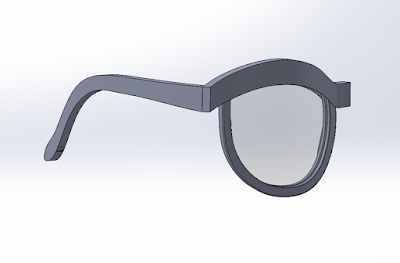
I modeled the sunglasses arms in a very similar way to the smooth operators, with some small changes. The first arm I made didn't line up with the curve of the trim and protruded out from behind it, I went back to the start and made the inside surface smaller to line up with the curve.
I added the swept detail across the front and sides to give the design a little bit more intricacy. Because is only small its not a big feature but will allow light to bounce off the dip in the surface.
I found this material for Keyshot on a forum and downloaded the beta to use on my sunglasses. I really wanted a tortoise shell appearance so I am super excited to see how it looks!
I found it at: https://www.keyshot.com/forum/index.php?topic=6168.0
Sunday, 19 June 2016
First Stages of Modelling
I begun modelling the sunglasses for the final assessment. I begun with the trim piece because it is the pivotal component that all the others are modeled around. I am quite impressed how quickly they are coming together now that I am not watching tutorials as I model.
I made the trim piece by projecting a curve and then filling the surface. I then projected a second curve for the back which is slightly skewed to one side of the front. I lofted these two surfaces to get the trim. I tested this a few times to see how the bridge looks once it is mirrored and adjusted the curve accordingly.
I made the rim by making a boundary surface based off the trim curve and cutting it with a sketch of the rim taken from my 1:1 model photo. I used the offset surface command repeatedly to create the rim and then the lens to fit inside. Once I had both the rim and the lens I created another part that is the same width as the rim the whole way along and used this to make a cavity in the trim so that the rim can slide in perfectly with the lens inside.
My design does not have separate nose grips like the smooth operators did so I had to figure out how to make the rim shape into the correct position to grip the nose. I did this using the freeform command and a lot of trial and error. I had not used this command much before but I eventually got to a stage where I was pretty happy with the result.
Monday, 13 June 2016
Next Iteration Model
Sunday, 29 May 2016
1:1 Model
I made a 1:1 scale model out of sculpey clay to help me gauge the size and scale of my design. I found this to be very helpful as my model was much too big on my face and requires scaling down. Its also impossible to take a good photo in the presence of my cat.
Thursday, 26 May 2016
Glarce Entry Revisited
I really wasnt proud of my Glarce Academy entry so here I have refined my design a bit more to better suit my design intent. Unfortunately I have not had time so far this week to make a model but I am close to that stage.
My thought for this design is that the top trim piece is similar to the one from the Smooth Operators from the last assignment except that instead of having a separate bridge, it is all made of one piece. The lens frames slot into the trim piece and support the lenses. These would be screwed into the trim in a similar way also. I wondered if the lens frames could be open at the top so that the lenses can be easily be removed and changed when the frame is unscrewed.
The arms, trim and lens frames will all be made of plastic. I would like to incorporate the nose grip into the lens frames.
I added an embossed line detail that follows the arms and trim, giving a bit more visual interest to the shape.
Monday, 23 May 2016
Subscribe to:
Comments (Atom)


