Wednesday, 30 March 2016
Sunday, 27 March 2016
Mini Figure Modelling Continued
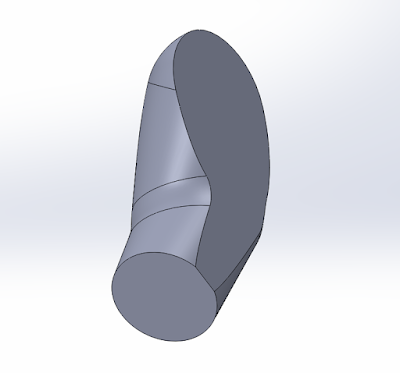
Continuing with the tutorial video I learned how to loft organic shapes to make them look more natural using tangent relations just like in the sketching mode. Using this process I lofted the upper arm and then the elbow join. I can see at this point that my part shape is pretty close to the physical part.
Once the arm shape was completely solid I followed the instructions for cutting the inner arm flat area and then extruded the arm insert peg using a series of extrudes and cuts. This part of the part was not demonstrated in the tutorial so I relied on my own skills and I am pretty happy with the result.
To finish the part I cut a hole into the front of the arm to house the hand and applied a series of fillets to the sharp edges to resemble the smooth edges of the physical part.
I modeled the mini figure head quite easily using the revolve function and some extra cuts to model the inside intricacy. As the mini figure I am modelling from is Hermione from Harry Potter, I decided to adapt the character to be Harry himself. To do this I used the pre-existing smiling LEGO face and used illustrator to add his trademark scar.
I used the split face function outlined in the tutorial to prepare the surface of the mini figure head and applied the decal I made to one side. I had some trouble applying the decal itself because it was a PNG file, I needed to change the solidworks settings to recognise the transparent background and flip the image until it was facing the right direction.
The mini figure head is almost complete at this point, I just realised that I need to add a couple of fillets to smooth out the top and bottom edges.
Thursday, 24 March 2016
Week 4
Minifigure Arm Modelling
I have been following the online tutorial to make the minifigure arm and I am very glad that there is a tutorial because I wouldn't have even known where to start such a complex part. I have not yet finished the arm but I have spent hours stopping and starting the instruction video trying to make my model resemble the one shown.
I started with a photo of the form like the video instructed, but my photo perhaps was not the best. I did not know that you could insert a photo to reference the geometry, that is a really neat trick.
I realised I had made a mistake when I was trying to do the forearm loft, I had drawn the arm end circle on the front plane instead of the right plane. Once I figured this out I went back into the sketch, deleted the wrong circle and re drew it on the correct plane.
This is where my model is currently. I have just done the forearm loft and created the plane to do the upper arm loft. At this stage I think that my model is correct- lets hope anyway!
Friday, 18 March 2016
Week 3
LEGO Mini Figure Modelling
I started with the chest section of the mini figure because that is where the in class tutorial started but I was happy that the tutorial didn't show exactly how to make the whole part so i could challenge myself to remember how to use the different tools and functions.
Friday, 11 March 2016
Week 2
Wine Bottle Modelling Exercise
The wine bottle exercise was a good way to get back into CAD after the break. Being able to follow the in class tutorial was invaluable because I know I would have been lost without it.
I struggled when it came to doing the revolve of the bottle shape, Solidworks kept saying that there was an issue with an intercepted line or something but I couldn't find the problem. After much googling I found the 'Tools>Sketch Tools>Check Sketch for Feature' option which highlighted a point that was incorrect in the inner offset section of the drawing. I re did this part of the drawing and I was very happy to finally revolve the shape.
Thursday, 3 March 2016
Week 1
Collecting Items for Projects
At the commencement of this subject we were told to collect a series of items that we will use to create the CAD models for this assessment. These included a set of vernier callipers, a LEGO mini figure and the choice of either a Logitech m235 mouse or a pair of 'Smooth Operator' sunnies from Cotton On.
I decided to get digital calipers because they were available at a really good price in comparison to the non-digital versions. The brand and quality is not as good as other (more expensive) models but for the purposes of this project they are more than adequate.
I already owned a few LEGO mini figures so I found a couple that I liked and I will then choose one to model. The two that I picked were Robin Hood and Hermione Granger -I couldn't find Harry Potter but I figured that their bodies would be the same haha.
I decided to choose the sunglasses for the photo study because I found them to be the more interesting item of the two. I purchased my pair for $14.95.
Subscribe to:
Comments (Atom)


