Friday, 24 June 2016
Wednesday, 22 June 2016
Final Stages Of Modeling
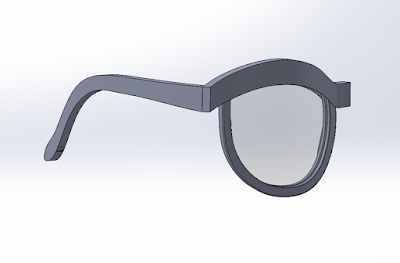
I modeled the sunglasses arms in a very similar way to the smooth operators, with some small changes. The first arm I made didn't line up with the curve of the trim and protruded out from behind it, I went back to the start and made the inside surface smaller to line up with the curve.
I added the swept detail across the front and sides to give the design a little bit more intricacy. Because is only small its not a big feature but will allow light to bounce off the dip in the surface.
I found this material for Keyshot on a forum and downloaded the beta to use on my sunglasses. I really wanted a tortoise shell appearance so I am super excited to see how it looks!
I found it at: https://www.keyshot.com/forum/index.php?topic=6168.0
Sunday, 19 June 2016
First Stages of Modelling
I begun modelling the sunglasses for the final assessment. I begun with the trim piece because it is the pivotal component that all the others are modeled around. I am quite impressed how quickly they are coming together now that I am not watching tutorials as I model.
I made the trim piece by projecting a curve and then filling the surface. I then projected a second curve for the back which is slightly skewed to one side of the front. I lofted these two surfaces to get the trim. I tested this a few times to see how the bridge looks once it is mirrored and adjusted the curve accordingly.
I made the rim by making a boundary surface based off the trim curve and cutting it with a sketch of the rim taken from my 1:1 model photo. I used the offset surface command repeatedly to create the rim and then the lens to fit inside. Once I had both the rim and the lens I created another part that is the same width as the rim the whole way along and used this to make a cavity in the trim so that the rim can slide in perfectly with the lens inside.
My design does not have separate nose grips like the smooth operators did so I had to figure out how to make the rim shape into the correct position to grip the nose. I did this using the freeform command and a lot of trial and error. I had not used this command much before but I eventually got to a stage where I was pretty happy with the result.
Monday, 13 June 2016
Next Iteration Model
Sunday, 29 May 2016
1:1 Model
I made a 1:1 scale model out of sculpey clay to help me gauge the size and scale of my design. I found this to be very helpful as my model was much too big on my face and requires scaling down. Its also impossible to take a good photo in the presence of my cat.
Thursday, 26 May 2016
Glarce Entry Revisited
I really wasnt proud of my Glarce Academy entry so here I have refined my design a bit more to better suit my design intent. Unfortunately I have not had time so far this week to make a model but I am close to that stage.
My thought for this design is that the top trim piece is similar to the one from the Smooth Operators from the last assignment except that instead of having a separate bridge, it is all made of one piece. The lens frames slot into the trim piece and support the lenses. These would be screwed into the trim in a similar way also. I wondered if the lens frames could be open at the top so that the lenses can be easily be removed and changed when the frame is unscrewed.
The arms, trim and lens frames will all be made of plastic. I would like to incorporate the nose grip into the lens frames.
I added an embossed line detail that follows the arms and trim, giving a bit more visual interest to the shape.
Monday, 23 May 2016
Final Modelling
Getting down to the final components and assembly I encountered a few things that set me back. The nose bridge caused me trouble because I made it a bit too curved initially and therefore it intersected the trim after I made allowance for it. I had to go back into the sketches and change its shape to make it fit. I had a similar problem when it came to mirroring the assembly, the nose bridge was too curved and caused the whole frame to be too concave.
The assembly came together quite nicely. I found it hard to get the curved surfaces to mate together so many of them are simply fixed in place.
Thursday, 19 May 2016
Continued Modelling and Trouble Town
I managed to model the trim piece well enough after a bit of mucking around. I was struggling to loft it as a surface and then make it a solid so in the end I just lofted it as a solid. That's probably not correct but at this stage I just needed to keep moving. The result is the same for all intents and purposes. I haven't yet put the flat spot on the back for the arm, I will need to do this before the arms can go on.
I couldn't find any instructions for how to make the nose bridge, although Dan did say they would be available. I made it simply by creating the front surface and using the thicken tool. The detail I made by using the curve tool to project a sketch onto the surface and then using a swept cut from the right plane to make the circular indent.
I have spent the last day stuck as my model decided to get confused by external references. I think I have finally figured out how to break the missing references and can finally continue modelling where I left off.
Thursday, 12 May 2016
Modelling the Sunglasses Arm and Lens Rim
I had some time to make up this week so I've been working really hard to catch up to the in class demonstrations. The most difficult part so far was the glasses arm as its shape is so organic but the tutorials were easy enough to follow.
I had tried previously to use the cavity feature with no luck so i was glad to learn how to use it. I had trouble when i tried to select it from the features menu as the function was grayed out. After trying to figure out how to get it back I realised my problem was that my arm was still a surface as I did not make it into a solid when I made the part. Once I figured that out it worked perfectly.
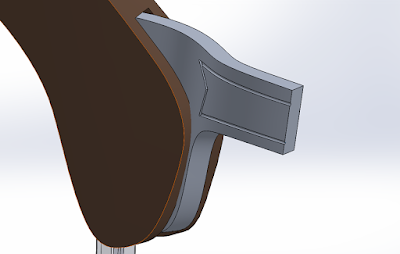
When I first made the hinge part I did not take it out of the arm and therefore did not know about the lugs on the bottom. When I saw them in the video I went back into my original park and added them in.
Thursday, 5 May 2016
Glarce Academy Submission
Due to poor time management I did not give myself enough time to refine my submission for the Glarce Academy competition. I really would have liked to produce higher quality images to submit. I chose to enter under the vintage category. I also have not developed my drawing skills which is proving to be a setback.
Sunday, 1 May 2016
Practicing surfaces
I haven't got as much of the mock up sunglasses done as I probably should have as I spent most of my study break attempting to model my iron prototype for studio 3. I used a very similar process to the mouse tutorials to build the iron body and so far I am really happy with the result, although it has meant that I have compromised time that I should have spent on the sunglasses project. I am hoping that this practice with surface modelling will help me catch up the lost time.
I did however attempt to make a sunglasses arm (before watching the in class tutorial) and was fairly happy with the result for a first attempt. I achieved it by making a projected curve and thickening the surface created.
Friday, 22 April 2016
Smooth Operator Small Component Modelling
I started off the sunglasses modelling by making the small components that are quite simple to make using the solid modelling techniques that I already know how to do. The other components are more complex and will require surface modelling.
Arm Hinge

Nose Grip
Sunday, 3 April 2016
Minifgure Accessory
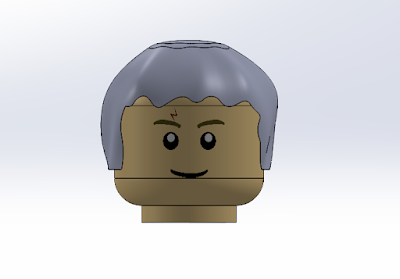
There were a few accessories I thought about making for Harry like a wand or broomstick but I decided to make him some hair since the figure that I have is actually Hermione Granger. I used a series of planes to create the loft for the hair. The two middle planes are circles made using the spline tool to create the illusion of waves in the hair. I ended up using some guide curves as well.
I first drew a sketch of the inside head shape and used this as a guide for the loft. I created a solid shape using the loft and then used a revolve cut to hollow out the inside shape.
I drew the shape for the face cutout on the front plane and cut through one side of the helmet. I did the same for the back edges to give the hair a less straight cut against the back of the head. Finally I did a fillet around the entire edge and changed the appearance to resemble the correct hair colour.
Subscribe to:
Comments (Atom)


